This guide follows the Olympus EBUS manual-cleaning sequence and the STERIS connection diagram for Olympus EBUS endoscopes.
Manufacturer sequence reviewedRequired equipment
Supplies and accessories
Leakage tester MB-155 with maintenance unit MU-1
Ultrasound connector cap MAJ-2295
Suction-cleaning adapter MAJ-222
SCOPE BUDDY PLUS Endoscope Flushing Aid
SB-110-HU1016 24-hour universal hookup tubing
BW-411B or BW-15B channel-cleaning brush
BW-400B or BW-7B balloon-channel brush
BW-411B or MH-507 channel-opening brush
Clean lint-free cloths, brushes, or sponges
Fresh medical-grade detergent solution and reprocessing water
Current Olympus reprocessing instructions, STERIS connection guide, ScopeBuddy Plus operator manual, and facility-validated program
Before manual cleaning
Prepare the scope and perform the leakage test
Complete preparation and leakage testing before channel brushing or powered flushing.
Scope preparation
Confirm that bedside pre-cleaning is complete and that the balloon has been removed and discarded.
Detach the suction valve and biopsy valve for separate reprocessing.
Confirm that the MAJ-2295 ultrasound connector cap is dry, clean, and securely attached before immersion.
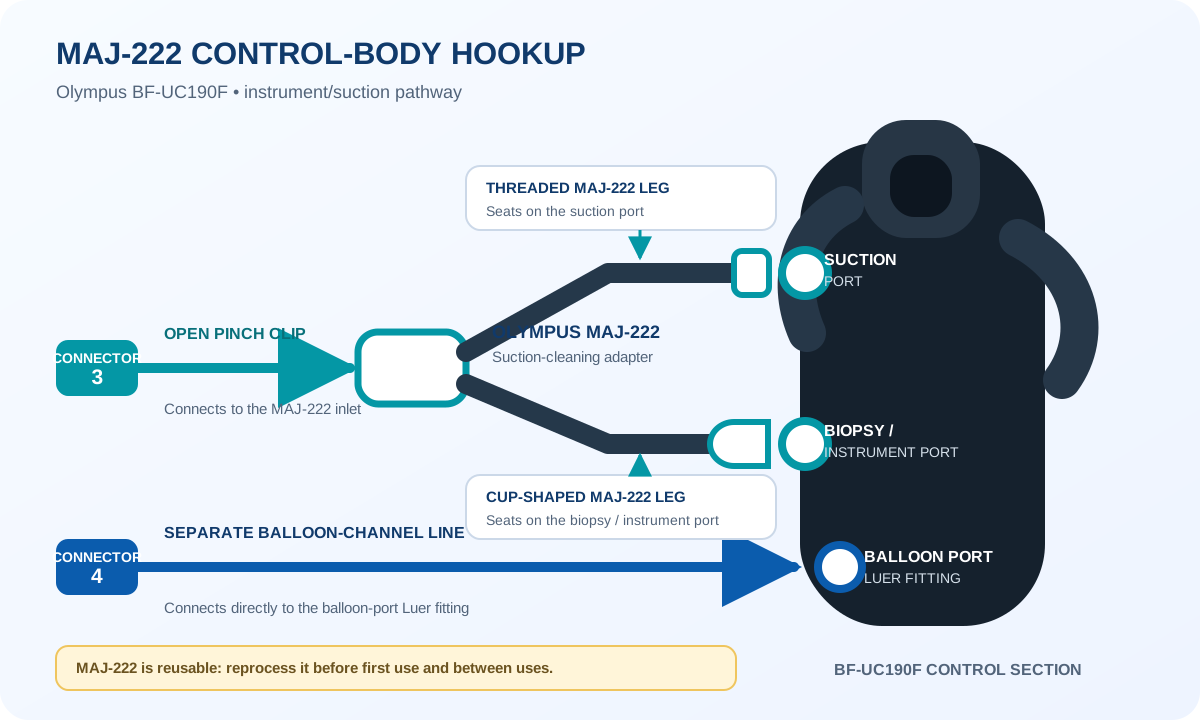
Prepare the MAJ-222 suction-cleaning adapter; it will be used for the instrument/suction pathway.
Leakage-test sequence
Fill a clean basin with reprocessing water and connect the MB-155 leakage tester to the MU-1 maintenance unit.
Turn the MU-1 on, depress the pin in the tester connector cap, and confirm that air is emitted.
Confirm that both the tester cap and the scope venting connector are completely dry, then connect the tester.
Completely immerse the endoscope and observe it for approximately 30 seconds while angulating the bending section.
Confirm that no continuous stream of bubbles emerges from any location. If a leak is found, remove the scope with the tester still attached and follow Olympus repair instructions.
After a passing test, remove the scope from the water with the tester attached, disconnect the tester from the MU-1, and wait 30 seconds or until the bending section returns to its normal size.
Detach and thoroughly dry the leakage tester.
Model-specific sequence
Complete manual-cleaning workflow
Manual brushing remains required. ScopeBuddy Plus supports the subsequent aspiration, measured flushing, rinse, and air-purge stages when connected and programmed for the BF-UC190F.
Visual connection guide
MAJ-222 and ScopeBuddy Plus hookups
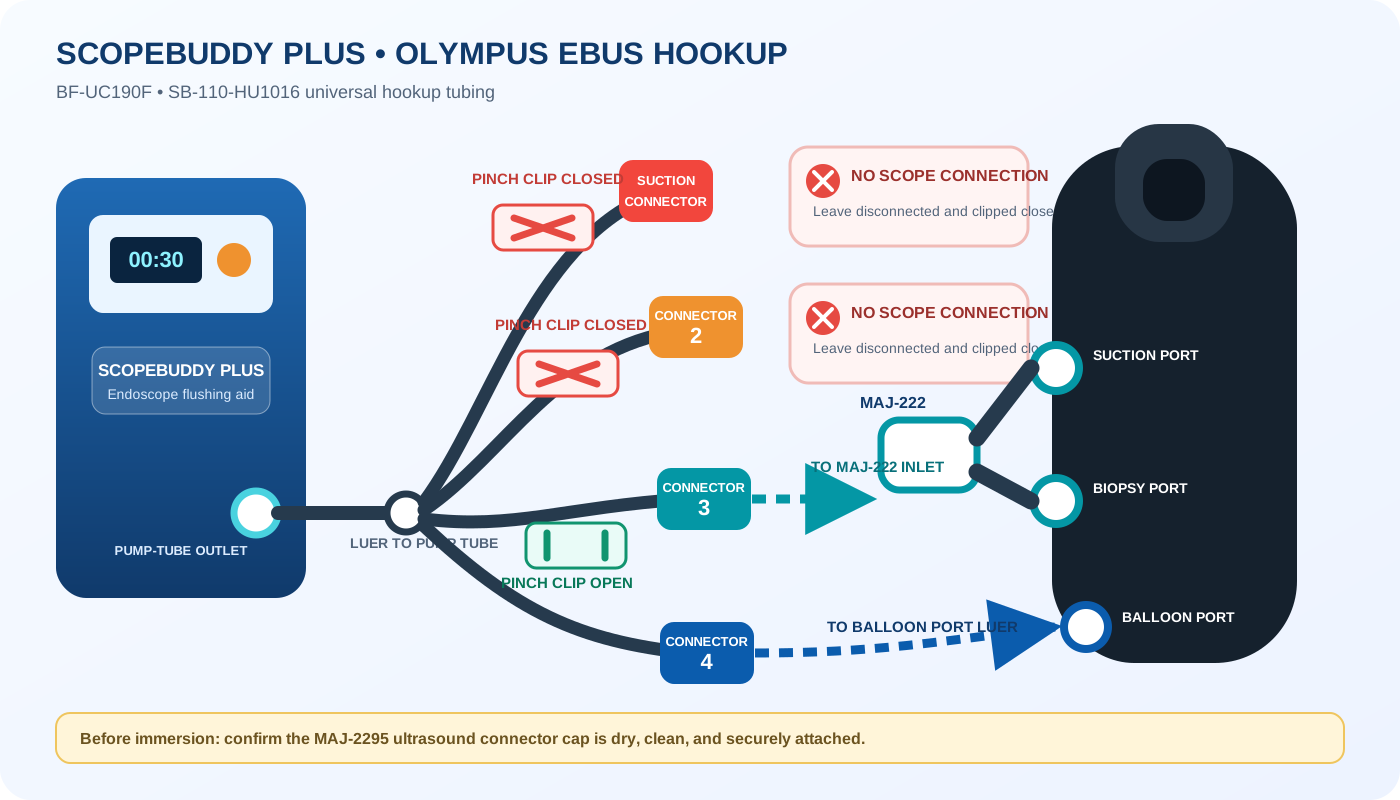
Use these diagrams with the written connection steps. The colors identify the two active paths and the branches that stay disconnected.
Matched to STERIS EBUS diagram
01
Attach the MAJ-222 to the scope
The adapter bridges the suction and biopsy/instrument ports. Connector 3 enters the adapter; Connector 4 bypasses it and goes to the balloon port.
Connector 3 is open to the MAJ-222 and Connector 4 goes to the balloon port. The red suction branch and Connector 2 remain disconnected with their clips closed.
Active instrument/suction path Active balloon-channel path Disconnected and clipped closed
01
Prepare fresh detergent
Detergent basin • PPE
Prepare fresh medical-grade detergent at the concentration and temperature specified by the detergent manufacturer.
Use a basin large enough to completely immerse the endoscope without coiling it too tightly.
Keep the BF-UC190F completely immersed during the manual-cleaning steps unless a step specifically directs removal.
02
Clean and inspect all exterior surfaces
Lint-free cloths • brushes or sponges
Completely immerse the scope and thoroughly wipe the insertion section.
Remove the insertion section from the solution and inspect the objective lens, ultrasound transducer, distal end, and all other external surfaces.
Repeat wiping until no visible debris remains.
Immerse and thoroughly clean the control section, boots, universal cord, connector section, and MAJ-2295 cap.
Inspect every cleaned surface and repeat the cleaning action wherever debris remains.
03
Brush the instrument and suction pathways
BW-411B or BW-15B • opening brush
From the suction cylinder, advance the channel brush with short strokes until it exits the distal end.
Clean debris from the bristles in the detergent, pull the brush back through the channel, and repeat until no debris appears.
From the instrument channel port, advance the channel brush with short strokes until it exits the distal end.
Clean the bristles, pull the brush back, and repeat until no debris appears.
Brush the suction cylinder with the opening brush inserted halfway; rotate one full revolution, withdraw, clean, and repeat until clean.
Brush the instrument channel port with the opening brush fully inserted until the handle reaches the opening; rotate one full revolution, withdraw, clean, and repeat until clean.
04
Brush the balloon channel and grooves
BW-400B or BW-7B • opening brush
Insert the balloon-channel brush into the irrigation port and advance it with short strokes until it exits the distal end.
Clean the bristles in detergent, carefully pull the brush back through the channel, and repeat until no debris appears.
Brush the irrigation-port opening with both the short and long ends of the channel-opening brush, rotating each one full revolution.
Repeat the irrigation-port brushing until no debris appears.
Brush both balloon grooves at the distal end until all visible debris is removed.
05
Connect ScopeBuddy Plus for this EBUS scope
SB-110-HU1016 • MAJ-222
Confirm that the ScopeBuddy Plus daily setup, dosing verification, pump tubing, and facility-approved BF-UC190F program are ready.
Attach the MAJ-222 suction-cleaning adapter to the scope.
Use the SB-110-HU1016 universal hookup tubing—not the SB-110-HU1007 GI tubing set.
Connect the universal hookup tubing to the ScopeBuddy Plus pump tube and to the BF-UC190F exactly as shown on the Olympus EBUS page of STERIS Connection Guide M11952EN.
Seat the two MAJ-222 legs on the suction port and biopsy/instrument port.
Connect Connector 3 to the MAJ-222 inlet and leave its pinch clip open.
Connect Connector 4 directly to the balloon-port Luer fitting.
Leave the red suction connector and Connector 2 disconnected from the scope, and close both of their pinch clips.
Confirm that the MAJ-2295 cap remains secure and that all tubing is fully seated, unkinked, and routed without tension.
06
Aspirate detergent through the instrument/suction path
ScopeBuddy Plus aspiration • MAJ-222
Remove the scope from the detergent only as needed to make the verified hookup, then immerse the distal end in detergent.
Use the ScopeBuddy Plus aspiration function through the MAJ-222 pathway for approximately 30 seconds or more.
Confirm that detergent is moving through the intended instrument/suction pathway.
Do not substitute the conventional Olympus EUS two-stage-valve aspiration wall chart; the BF-UC190F uses the EBUS hookup in the STERIS connection guide.
07
Fill both channel pathways with detergent
Powered detergent flush
Completely immerse the endoscope and MAJ-222 in detergent solution.
Run the facility-validated ScopeBuddy Plus fill/flush step that delivers the Olympus-required equivalent of 30 mL once through the instrument/suction pathway.
Run the verified balloon-channel connection to deliver 30 mL once through the balloon channel.
Observe the distal openings and confirm unobstructed detergent flow.
Do not disconnect an immersed pathway until the programmed step is complete.
08
Wipe and soak
Detergent contact time
While the scope remains immersed, wipe all exterior surfaces again.
Soak the scope and immersed reusable cleaning adapter for the detergent manufacturer’s required time and temperature.
The powered flushing aid does not replace the detergent contact time.
09
Rinse the exterior
Fresh rinse water
Transfer the scope and cleaning equipment to a basin of clean reprocessing water.
Completely immerse the items and gently agitate them to rinse all external surfaces.
Move the ScopeBuddy Plus fluid intake to the clean rinse water according to its operator manual and the validated facility procedure.
10
Aspirate rinse water and air
Instrument/suction pathway
With the MAJ-222 and verified EBUS hookup attached, aspirate clean water through the instrument/suction pathway for 30 seconds or more.
Remove the scope from the rinse water while keeping the approved hookup attached.
Aspirate air through the instrument/suction pathway for 20 seconds.
Confirm that residual water is expelled from the distal opening.
11
Flush and air-purge the balloon channel
Balloon-port Luer • measured delivery
Using the verified balloon-port connection, flush 30 mL of clean water through the balloon channel five times for a total of 150 mL.
Remove the scope from the water and use the ScopeBuddy Plus air-purge function to deliver 30 mL of air five times for a total of 150 mL.
Confirm that water is expelled from the balloon-channel outlet and that the programmed measured delivery is complete.
12
Disconnect, dry, and inspect
Clean lint-free cloths
Disconnect the universal hookup tubing and MAJ-222 according to their current instructions.
Thoroughly wipe and dry every external surface of the BF-UC190F and reusable cleaning adapter.
Inspect the objective lens, ultrasound transducer, distal end, ports, channel openings, balloon grooves, and all exterior surfaces.
If any debris remains, repeat the complete manual-cleaning procedure.
Continue with the next required reprocessing stage and process reusable accessories separately.
Retain or replace the ScopeBuddy Plus 24-hour tubing according to the current STERIS instructions and facility policy.
Measured channel steps
BF-UC190F timing and volume targets
The selected ScopeBuddy Plus program must reproduce the Olympus time- and volume-based requirements below.
Pathway
Detergent
Water rinse
Air purge
Instrument / suction
Aspirate ≥30 sec; then 30 mL-equivalent fill
Aspirate ≥30 sec
Aspirate 20 sec
Balloon channel
30 mL × 1
30 mL × 5 (150 mL total)
30 mL × 5 (150 mL total)
Do not miss
Critical model limits
Attach the dry MAJ-2295 ultrasound connector cap before immersion.
Keep the scope completely immersed while brushing and during wet channel-filling steps.
Use the STERIS Olympus EBUS connection diagram, not the GI or conventional EUS diagram.
Use SB-110-HU1016 and MAJ-222; do not attach MH-944 or SB-110-HU1017 to the BF-UC190F.
Repeat each brushing pathway until no debris remains on the brush.
If debris remains after final inspection, repeat the complete manual-cleaning procedure.
Manufacturer referencesReviewed against the Olympus BF-UC190F Endoscope Cleaning Guide OAIRES0221WC39693, the Olympus BF-UC190F Cleaning and Disinfection Checklist, and the STERIS ScopeBuddy Plus Connection Guide M11952EN, Rev. B (Olympus EBUS page). Confirm the current Olympus reprocessing manual, ScopeBuddy Plus operator manual, tubing instructions, and facility-validated program before clinical use. Olympus cleaning guide · Olympus checklist · STERIS EBUS connection guide
 Open full-size MAJ-222 diagram →
 Open full-size ScopeBuddy diagram →